| Hantera paket | ||
|---|---|---|
 | Använda aptitude |  |
| Hantera paket | ||
|---|---|---|
| | Använda aptitude | |
Now that you can move about the list of packages, it's time to start using aptitude to install and remove packages. In this section you will learn how to flag packages for installation, deletion, and upgrade.
![[Tips]](images/tip.png) | Tips |
|---|---|
You can only change your system's setup as the |
All changes to a package are performed by first highlighting it in the package list, then pressing a key corresponding to the action which should be performed. The basic action keys [2] are + to install or upgrade a package, - to remove a package, and = to prevent a package from being automatically upgraded (this is known as holding the package). These actions are not performed immediately; aptitude will simply update the package list to show the change that has been requested.
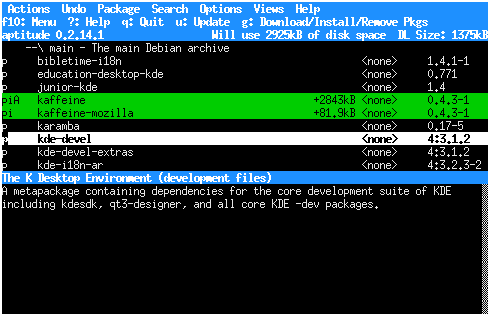
For instance, in the screen shot below, the
kaffeine package was selected and
+ was pushed. The package is now highlighted in green and
the letter “i” has appeared to the left of its name, to
indicate that it will be installed; in addition, an estimate of the amount
of space that the package will use is displayed.
 |
| Tips |
|---|---|
At any time, you can use → (Control+u) to “undo” any change to one or more packages. This is very useful if an action has unforseen consequences and you want to “take it back”. |
In addition to actions that affect individual packages, another important action is available: typing U will attempt to upgrade any packages that can be upgraded. You should use this command on a regular basis to keep your system up-to-date.
Sometimes, changing a package's state will cause dependency relationships to
become unfulfilled; packages with unfulfilled dependencies are said to be
broken. aptitude will warn you when this happens,
and explain why it occured. For instance, here is what happens if I attempt
to remove sound-juicer:
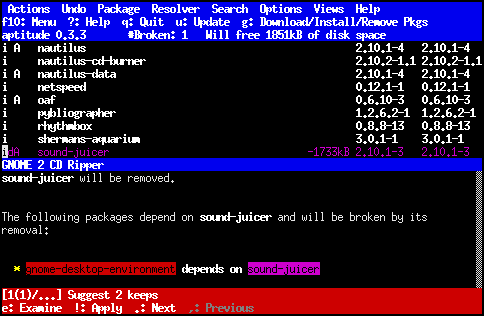 |
As you can see, aptitude displays three indicators that something has gone
wrong: first, the number of broken packages is displayed in the upper blue
area; second, the lower half of the display changes to describe broken
packages that are related to the currently highlighted package; third, a bar
appears at the bottom of the screen with a suggestion on how to solve the
problem. To quickly find broken packages in the package list, you can press
b or search for ~b.
![[Notera]](images/note.png) | Notera |
|---|---|
The text |
To see more information about how aptitude thinks you can solve this problem, press e. A screen similar to the following will appear:
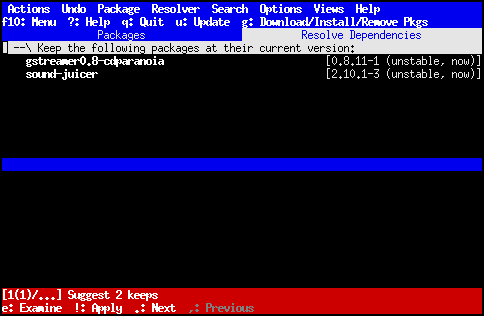 |
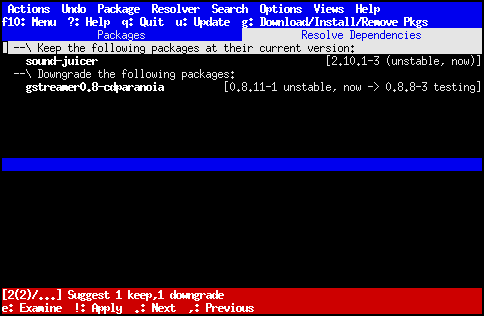
From here, you can see more solutions by pressing . or return to solutions that you previously examined by pressing ,. To apply the current solution and return to the package list, press !. For instance, pressing . while the above screen is displayed results in the following solution being presented:
 |
In addition to the basic solution navigation commands, you can press
r to “reject” actions of which you
disapprove. For instance, the first solution will cancel the removal of
sound-juicer -- the very action we were trying to
perform! By pressing r on the item corresponding to this
action, we can tell aptitude that it should not cancel the removal of
sound-juicer in this way.
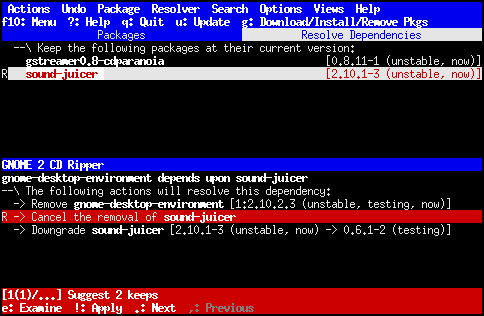 |
As you can see, the list item corresponding to keeping
sound-juicer at its current version has turned red
and been marked with an “R”, indicating that it has been
rejected. Solutions that you generate in the future (that is, any solution
that you have not yet viewed) will not include this action, although
solutions that were already generated and contain this action will be
available.
| Notera |
|---|---|
In the above screen image, a description of
|
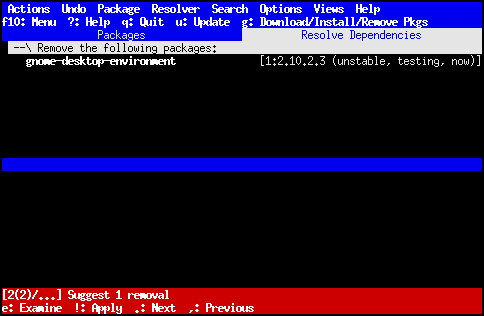
For instance, if this rejection is imposed immediately after removing
sound-juicer, pressing . retrieves
the following solution, skipping the solution that cancels the
installation of sound-juicer and downgrades gstreamer0.8-cdparanoia.
 |
Rejections are only applied to newly generated solutions: that is, solutions that are generated when you press . while viewing the last generated solution. Previously generated solutions can still contain rejections. You can cancel a rejection at any time by once again selecting the rejected action and pressing r; this will permit solutions containing the action to be generated again, including any solutions that were previously “skipped”.
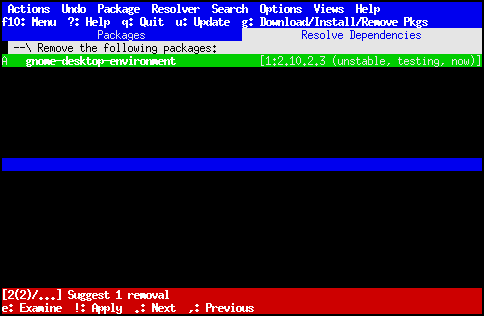
The opposite of rejecting an action is approving it. To approve an action, just select it and press a; this forces the problem resolver to choose the action whenever possible[3]. Approved actions will turn green and will be marked with “A”, as in the following screenshot:
 |
![[Viktigt]](images/important.png) | Viktigt |
|---|---|
If you do not resolve any broken dependencies, aptitude will automatically implement its current suggestion when you commit your selections by pressing g. However, it is hard to automatically solve dependency problems, and you may not be happy with the results, so it is generally better to look at what aptitude plans to do before committing your selections. |
[2] You can also change packages using the menu; see “Paketmenyn” for details.
[3] Approving an action is slightly different from requiring all solutions to contain the action; what it means is that given a choice between an approved action and a non-approved action, the resolver will always pick the approved action. If there are several possible approved actions, all of them will be candidates to be placed into the solution.
| |  | |
| Hitta paket efter namn |  | Uppdatera paketlistan och installera paket |